 Loxone
Miniserver
How to perform a Loxone Miniserver initial setup?
Can someone please walk me through the basic initial setup of the Loxone Miniserver? How to connect the Loxone Miniserver and the extensions?
 Loxone
Can someone please walk me through the basic initial setup of the Loxone Miniserver? How to connect the Loxone Miniserver and the extensions?
The Loxone Miniserver is suitable for all kinds of automation tasks as a central control unit. It has a slot for a replaceable microSD card containing an operating system and all the user settings.
It can be managed and controlled via the web interface, Loxone App, or locally from the LAN interface.
There are possibilities for installing up to 30 different extensions to the Loxone Miniserver via the interface, expanding its functionalities.
The Loxone Miniserver can be installed on a DIN rail for the most suitable positioning.
In order to start it correctly, first, connect the power supply as well as all the applicable interfaces. Then connect the Miniserver to your local router via the LAN port.
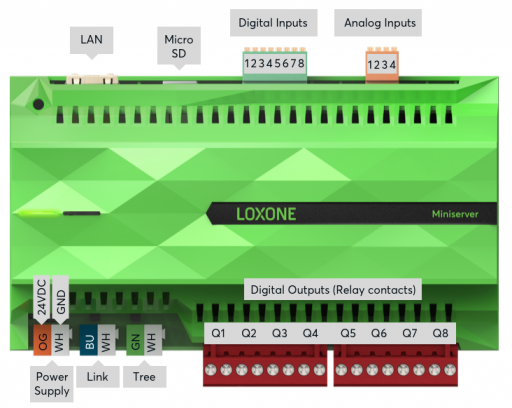
After connecting the power supply, the Loxone Miniserver is started, getting operational after a few seconds. After the bootup process, the left status LED will be blinking green once a second. On the other side, the right LED indicates if any System Status messages are available.
After the initial bootup process, the Miniserver is assigned an IP address from the router via a DHCP process. If DHCP is not enabled on your network or you are connected to it via a PC, -local addressing via Zeroconf can be completed, or manually assign a static IP address.
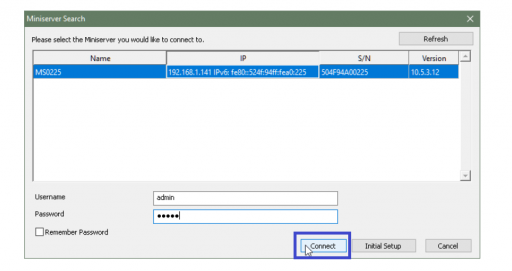
When all that is set up, you can go to the Loxone Config app and connect to the Loxone Miniserver. The initial factory settings for the user and password are the standard ones - admin/admin respectively.
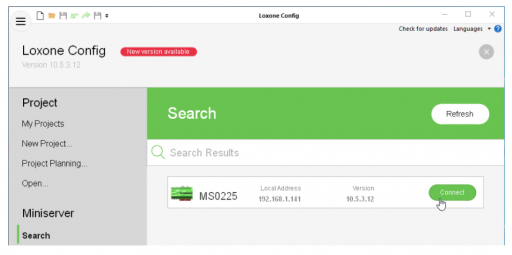
If it doesn't show automatically or it is your first time connecting, the following steps on the pictures will be available.
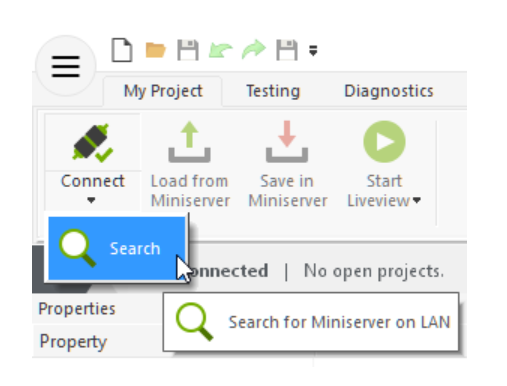
After it finds the Miniserver, press connect.
To connect all of the extensions properly, please follow the diagram below:
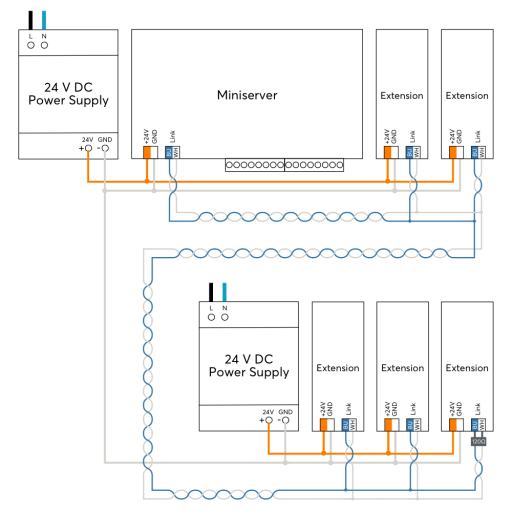
The extensions can be connected to the Loxone Miniserver by daisy-chaining the interfaces, where if any of the extensions have a separate power supply, then all of the power supply's GND (negatives) need to be interconnected (important for reliable data transmission).
The maximum length of a CAT5/6/7 twisted pair can be up to 500 meters or 1640 feet, connected to the interface. The blue and white pair is recommended by the manufacturer.
After connecting them physically, those extensions need to be added to the Loxone Config to function on the Miniserver. The steps for doing that are listed below:
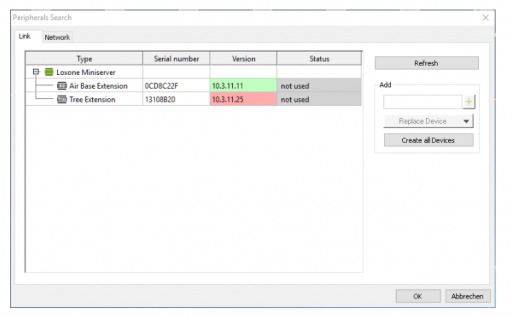
To know that you highlighted the correct extension, check its LED light where it is connected, it should start flashing.
With Replace devices, you can replace an existing extension with another of the same type, which is very useful when extensions need to be added to a preconfigured program.
To apply the changes, save the program on the Loxone Miniserver and now the added extensions are functional and available for programming in the Periphery Tree section of Loxone Config.
You know a better answer?
The question about Loxone has already been answered, but there may be a better solution or alternative available by now. If you know it, answer the question now and increase your reputation as an industry expert in our B2B community.
 Related Questions
How to perform factory reset of the Loxone Miniserver?
Can someone please guide me on how to perform the factory reset of the Loxone Miniserver? If possible, please also let me know how to...
How to setup remote access to the Loxone Miniserver?
I need to have remote access to my Loxone Miniserver when I am not on site. What are the requirements and steps to set up...
How to link Function Blocks with Loxone Miniserver?
What are the steps to design and link functional blocks with the Loxone Miniserver?
Was the content helpful to you?